Running an Import
Running a Data Import
Once an import mapping has been created, data can be imported into CollectiveAccess. There are two ways to import data into CollectiveAccess:
Directly from the command line (terminal). This method is recommended for larger imports, so the import is not tied up by a web browser.
Through a web browser within the Providence user interface in CollectiveAccess.
Both options require an import mapping spreadsheet, and source data in a supported data format.
Warning
Import mappings contain code. If code is invalid, the data importer in the user interface will refuse to upload the mapping. Common places where errors can occur in code phrases are with spaces, quotation marks, and spelling. Check code phrases for any inconsistencies; an online code validator and formatter is usually very helpful in catching any errors.
Note
Remember to always back up your database before running an import, as you will likely have to tweak imports multiple times.
Basic Steps for Running a Data Import
To run a data import in the terminal or through the CollectiveAccess user interface, eight basic steps are involved:
Create an import mapping spreadsheet. This can be made in Excel or in Google Sheets, and will serve as a crosswalk between source data and the destination in CollectiveAccess. This step is necessary for either manner in which an import will be executed. See Tutorial: Import Mapping Spreadsheet for complete instructions.
Create a backup of the database by executing a data dump before running the import.
Run the import from either the command line (terminal) or the graphical user interface in CollectiveAccess.
Check the data that has been imported in CollectiveAccess. Look for any errors or points of inconsistencies. Errors will usually show up in error messages during an import; however, it is necessary to conduct general quality checks in the system.
Revise the mapping accordingly.
Load the data dump so that the system returns to its pre-import state, or, returns to empty. To import changes successfully, it is recommended to wipe the system clean, so old imports are not confused with new.
Re-run the import (see Step 3). Revisions will show up in the new system.
Repeat Steps 3-7 until satisfied with the data import.
Steps for importing data from the terminal and importing data from the user interface in Collective Access will be explained below. These steps assume that source data is available in a supported file format, and that an import mapping spreadsheet has been created.
Running an Import from the Terminal
Follow the steps outlined below to generate a successful import from the terminal or command line.
Create a place where the data and data import mappings are easily accessible, without an inconveniently-long file path. For example, the import material could live in a Providence directory at:
/support/project/mappings and /support/project/data
Backup your data. Before importing, back-up your database:
mysqldump -u#name -p#password project > ~/project_date.dump
Define an import. This is done using load-import-mapping option of caUtils:
cd /path_to_Providence/support
bin/caUtils load-import-mapping --file=project/mappings/mapping1.xlsx
Run the import. Once the import has been created, it can be used. Using the utility import-data, give the correct name to -mapping parameter. For example:
Note
With the PHP ncurses extension installed, a display will provide moving status indicators including import progress and recent errors.
Check the data that has been imported into CollectiveAccess.
Modify the import and rerun the utility if something has gone wrong. To modify your import and rerun the utility, simply restore your database:
mysql -u#name -p#password project < ~/project_date.dump
Repeat Steps 1-4, until satisfied with the data import.
Running an import from the User Interface
Importing data through the user interface in CollectiveAccess is a great option for those unfamiliar with the command line, as it does not involve executing commands. Importing from the user interface simply involves uploading supported files; however, there are a few steps to follow.
Note
From the user interface it is also easy to add, delete, or download import mappings. For this method, it is necessary to have an import mapping and source data available in a supported file format.
Follow these steps below to run an import from the user interface in CollectiveAccess:
Navigate to Import/Data in CollectiveAccess. The CollectiveAccess import feature will be displayed:
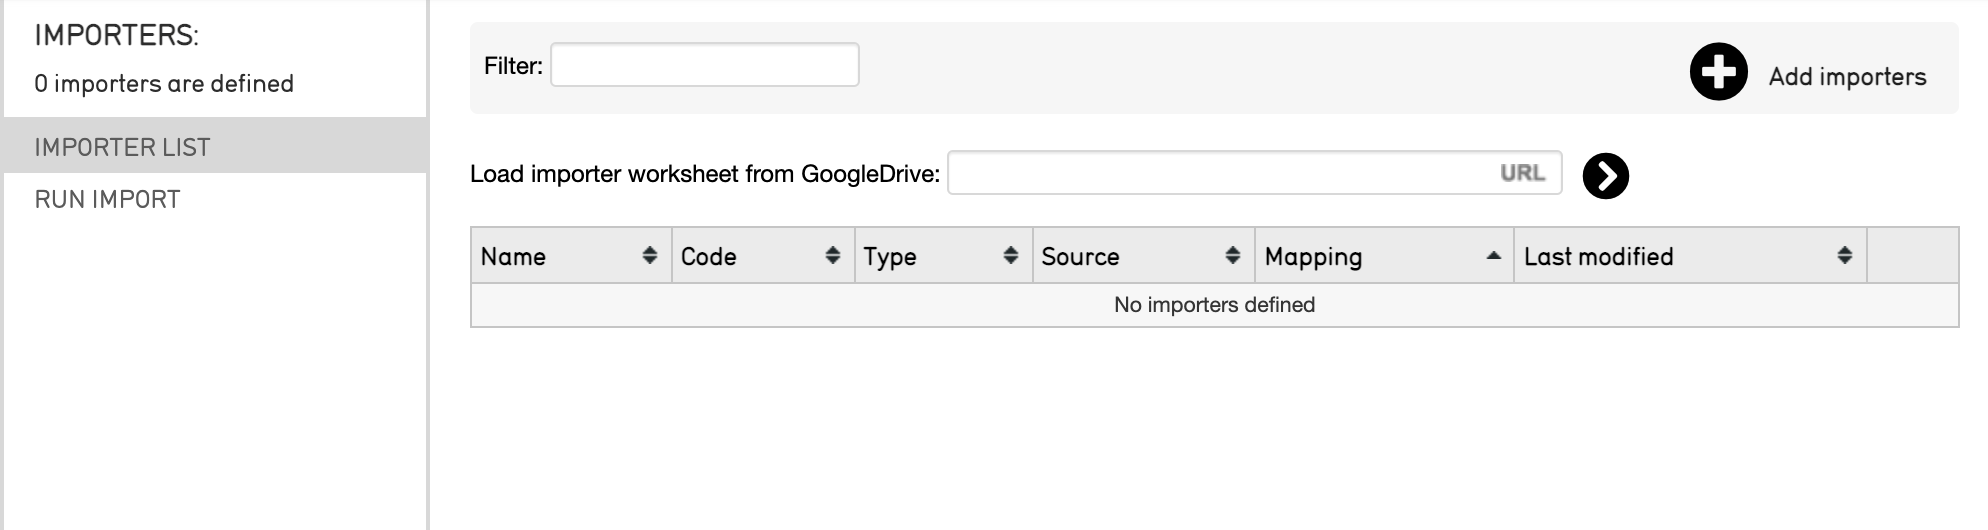
Select the plus sign icon
 in the top right corner. An area with “Drag importer worksheets here to add or update” will appear, where the import mapping spreadsheet to be dragged, or uploaded, into the user interface. In addition, the worksheet can be loaded with a URl from GoogleDrive.
Drag or drop the import mapping spreadsheet directly into the user interface, or add the Google Drive link to your import mapping.
Select the forward caret
 .
.
Have your source data available. In addition to the import mapping spreadsheet, it will also be necessary to upload the specific source data set into the user interface during this process, by dragging or uploading from a location on a computer. Have this file (or files) available in a supported format.
Upload the source data.
Configure the necessary settings. Select the Log Level and Testing Options. For more, see Data Importer (UI): Options for Importing.
Run the import by selecting Execute Data Import.
Revise the mapping accordingly.
Re-import, repeating Steps 1-6.
Order of Import
For data with more than one import mapping spreadsheet (such as Objects, Entities, Lots, and so on), the order in which the mappings are imported is important. Note, however, that this will differ for each data set.
For some data sets, considering the order for import is less important, as related records are created from a single mapping. When this is not the case, the import order can determine if records are matched properly and will help avoid errors during import.
Depending on the data set, the order of import will also affect what the Existing Record Policy in the Settings of an import mapping spreadsheet is set to.