XML Schema
Introduction
This manual describes how to build an installation profile using the XML-based schema, or modify an existing one. Each profile defines a number of aspects required in a working cataloguing system, including:
Metadata Elements and Attributes. Each element definition may include the types of data an element can accept, constraints on input, how and if it repeats, where it may be used, descriptive “help” text and more. With a few exceptions there are no hardcoded fields in CollectiveAccess: you define what you need.
Relationship types. Various types of catalogued items (objects, people, places, etc.) can be linked to each other with qualified relationships. The range of valid qualifiers for a given use-case is defined in the profile. As with metadata elements, you define only what you need for your project. You don’t have to keep irrelevant options around just because the developers thought they were a good idea.
User interfaces. There are no hardcoded editing user interfaces in CollectiveAccess. You can create as many editing interfaces as you need, each with its own unique arrangement of screen and field layouts. Each interface need only include the fields you need to edit, enabling the creation of use-specific editors for selected users and tasks. You can define user interfaces at any time using the CollectiveAccess online editor, but it is usually convenient (and highly recommended) to define at least a basic set of interfaces in a profile.
List and Vocabulary Management. Lists are used extensively in CollectiveAccess as controlled vocabularies for cataloguing, as value sets for metadata elements, and as system lists defining the allowed values for certain application functions, such as workflow statuses and object types. While you can create new lists at any time using the web-based list and vocabulary editor, it is usually more convenient to create you basic lists in a profile. In addition, system lists, which are required for proper application function, and lists used by metadata elements defined in the profile, must be defined in the profile.
Locales. The list of languages and cultures available for cataloguing purposes (e.g., the languages you’ll be cataloguing in - not the languages or cultures used for descriptive metadata) can be defined in the profile. You can translate help text and descriptive titles for all of the lists, metadata elements and user interfaces into any language defined in the profile as a locale.
As you can see, almost every aspect of the cataloguing tool set can be customized in a profile. It may look terribly complicated, but there’s no need to worry; it’s really not that difficult. And for almost every type of project there are plenty of pre-built profiles available to use as a starting point.
This manual should be enough to allow you to create your own profile. Topics covered in the next sections include:
A full explanation of the various sections and components that comprise a profile
Modifying an existing profile and building profiles from scratch
Installing and testing your profile
CollectiveAccess Basics
To work effectively with profiles it is critical that you understand the fundamental structures in the CollectiveAccess database. While CollectiveAccess provides great flexibility in terms of the specifics of your data model - you define your own fields, relationships and constraints - the general structure is fixed. CollectiveAccess defines fourteen types of “items” that model the world that your collection exists in - these are referred to as the Primary Types.
Installation profiles used with CollectiveAccess version 1.0 or later are written in XML. However, the structure of the document is very similar to that used in older profiles written in the previous syntax. As with the old syntax:
1 When used as a value, indicates “True” or “Yes” - will allow whatever action.
0 When used as a value, indicates “False” or “No” - will deny whatever action.
About Profiles
Installation profiles are “canned” configurations applied at installation time to create a working CollectiveAccess system. A profile defines all of the metadata elements, lists, locales and relationship types used by the system, and specifies how editing user interfaces for various items should operate. Because the values defined in a profile touch almost every aspect of a system, profiles can only be applied at installation time with the end result being an empty system conforming to the profile. You cannot use a profile to tweak an existing system.
Since CollectiveAccess also provides web-based tools for configuration of the same values as profiles, you may be wondering why one would choose to define a profile, an altogether more arcane approach, over using visual tools. There are several reasons:
Profiles allow you to fully configure an arbitrarily complex system in one go at installation time. The web-based tools have no provision for batch processing. You must add each metadata element, locale, relationship type, UI specification and list item one-at-a-time. For a setup of typical complexity using the web-based tools is an exercise in extreme tedium.
Profiles allow you to easily and repeat-ably install the same system setup across several installations. They also make it easy to share configurations with other users. The Configuration Library on the CollectiveAccess web site is a venue for sharing profiles you create with the wider CollectiveAccess user community.
Profiles provide a convenient base for extension of basic setups for specific uses. For example, several profiles implementing popular metadata standards are included in the CollectiveAccess application package. While these profiles can be used as-is, few serious users could use them that way. Rather they are valuable as starting points to customized systems based upon a given standard. All one needs to do is create a new profile that extends the chosen standard with one’s own required modifications.
Types of Profiles in CollectiveAccess
Installation profiles for CollectiveAccess are developed for specific projects or for conformance with a metadata standard. Profiles built for projects and collections are custom tailored to meet unique requirements for that particular institution. These profiles maybe useful if you have a similar collection or project. Some examples of project-specific installation profiles include:
Coney Island History Project, Brooklyn, NY, USA, (Historical Society Archive)
New Museum of Contemporary Art, New York, NY, USA, (Multimedia Digital Archive)
New School, New York, NY, USA, (Special Collections Archival Collection Management System)
Metadata standards based installation profiles create a generic cataloging interface that complies with established archival, museum, and library structure standards. These profiles offer a high level of sustainability and interoperability, but lack the custom features found in the project-specific profiles. Some examples of standards-based installation profiles include:
Dublin Core
PBCore
DarwinCore
VRACore
MARC
Whether you choose to use a project specific profile or a standards based profile, all can be modified. You can even create your own unique profile from scratch if need be. All profiles share the same components. The following sections describe these components.
Parts of a Profile
Installation Profiles consist of an opening declaration followed by five sections: Locale Definitions, List Definitions, Metadata Element Set (Attribute) Definitions, User Interface Definitions, and Relationship Types. Two additional and optional sections include Displays and Logins. Each of these performs a specific function within the software, and works interdependently within the profile. It does not matter in which order you define the main sections. For the optional sections Displays must come before Logins.
Profile Declaration
Every profile begins with its declaration that sets its name, description, and other important information. The profile declaration for DublinCore looks like this:
<profile xmlns:xsi="http://www.w3.org/2001/XMLSchema-instance" xsi:noNamespaceSchemaLocation="profile.xsd" useForConfiguration="1"
base="base" infoUrl="http://providence.collectiveaccess.org/wiki/DublinCoreInstallationProfile">
<profileName>[Standard] DublinCore</profileName>
<profileDescription>Use this profile if you want a system that is compliant with simple DublinCore</profileDescription>
The “profile.xsd” link allows a profile to inherit settings from another profile. This makes it possible to define settings shared across several profiles in a single, more easily maintainable, file. To have a profile inherit from another, set the “NamespaceSchemaLocation” to your .xsd base file.
Locale Definitions
Locale definitions specify which languages can be used for catalogued content. Any language can be coded into a profile by including its locale code, which is a combination of an ISO-639 country code and an ISO-3166-1 language code (see Locales for more information). Note that any locale code can be used, without restriction, for cataloguing of content. However, user interface translations (both in the CollectiveAccess application and within your profile) are limited to those locales for which application translation files have been produced. See Translations for a current list of application translations.
Coded for English:
<locales>
   <locale lang="en" country="US">English</locale>
</locales>
Coded for English and German:
<locales>
   <locale lang="en" country="US">English</locale>
   <locale lang="de" country="DE">Deutsch</locale>
</locales>
Let’s take a closer look at the above code. The parent tag states the part of the profile and the child elements define the system attributes for that part. In this case we are defining the locales, or languages, through the language and country declarations.
List Definitions
List definitions allow you to create three types of lists: lists that define specific elements of the cataloging interface (“system lists”), lists that define set values to control content and lists that defined controlled vocabularies that can be used for descriptive cataloguing.
System (Structure) Lists
In CollectiveAccess, you can select a cataloging interface (See Figure 1) based on what type of object, entity, collection or other item you are cataloging. Various system lists define these types.
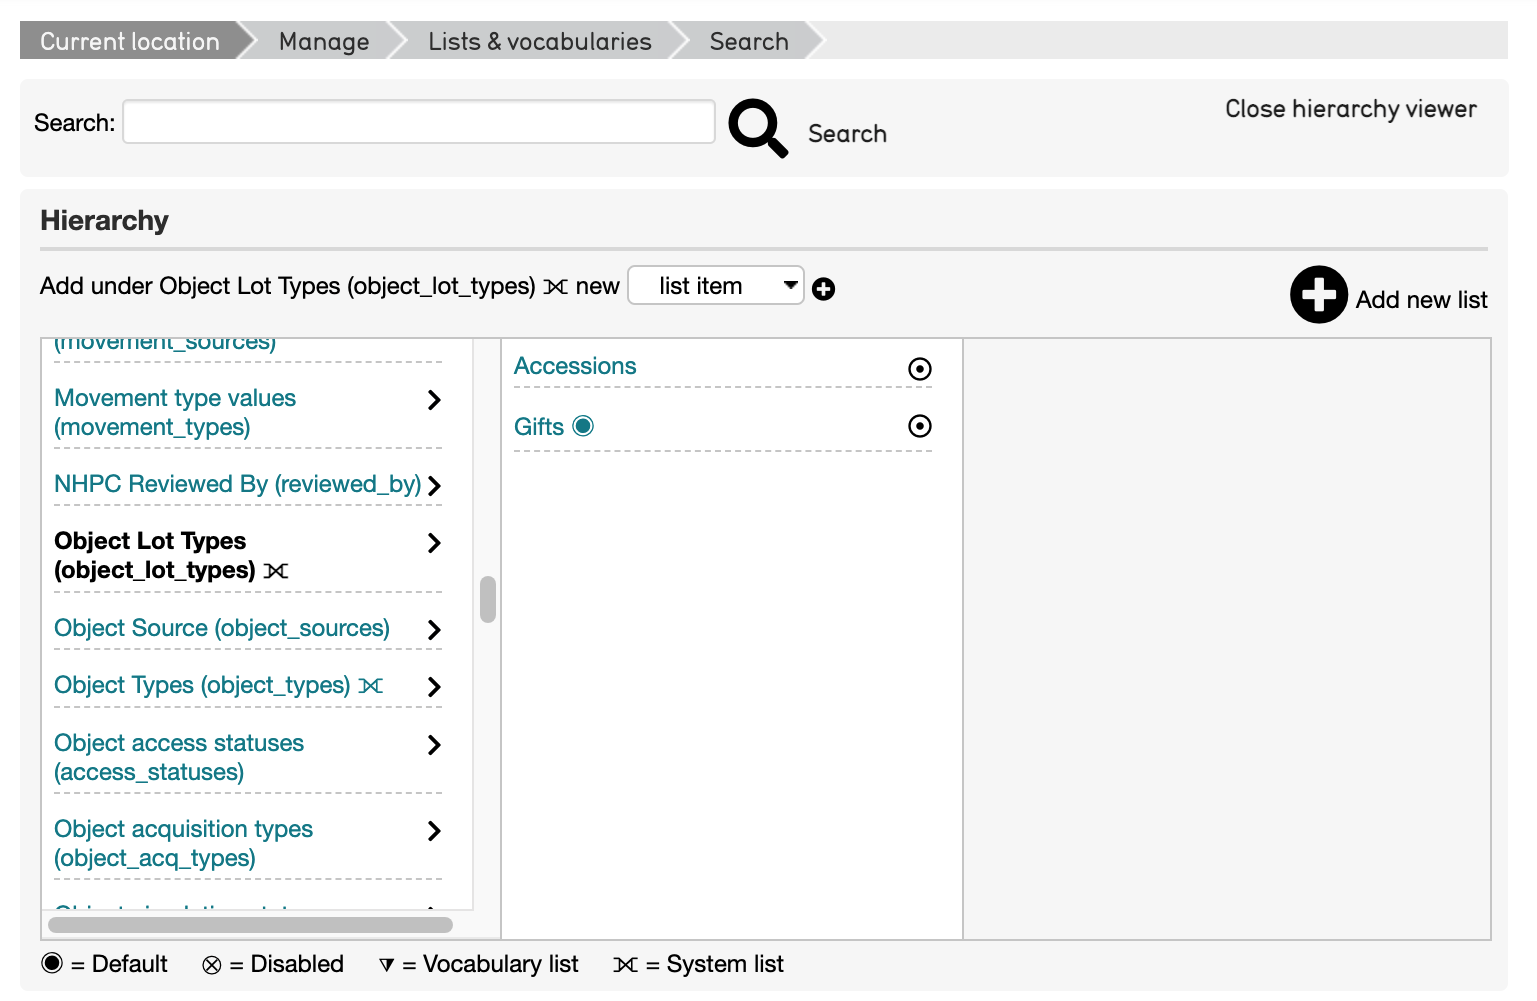
System lists as shown in the Lists & Vocabularies hierarchy. Note system lists are identified by ![]() .
.
For CollectiveAccess to function properly, 33 types of System Lists need to be present and defined for the Primary Types - objects, object events, lots, lot events, entities, places, occurrences, collections, storage locations, list items, object representations, object representation annotations and sets. All of the lists may be hierarchical, although most tend to be single-level in most cases.
Control (User) Lists
Control lists allow you to create a field with restricted options in a cataloging record. Lists can be rendered as drop-down menus, radio button, checklists and more. For additional information see the Attribute settings: List page. Let’s look closely at a control list for formats in Dublin Core:
<list code="dc_format" hierarchical="0" system="0" vocabulary="0">
      <labels>
        <label locale="en_US">
          <name>Dublin Core Format</name>
        </label>
      </labels>
      <items>
        <item idno="application" enabled="1" default="1">
          <labels>
            <label locale="en_US" preferred="1">
              <name_singular>Application</name_singular>
              <name_plural>Applications</name_plural>
            </label>
          </labels>
        </item>
        <item idno="audio" enabled="1" default="0">
          <labels>
            <label locale="en_US" preferred="1">
              <name_singular>Audio</name_singular>
              <name_plural>Audio</name_plural>
            </label>
          </labels>
        </item>
        <item idno="example" enabled="1" default="0">
          <labels>
            <label locale="en_US" preferred="1">
              <name_singular>Example</name_singular>
              <name_plural>Examples</name_plural>
            </label>
          </labels>
        </item>
      </items>
    </list>
Dublin Core actually has eight format types, but for the sake of this example, we’ve limited the code to just three. Now let’s break it down:
<list code> - “dc_format” is the unique code name for this list. Can not match any other list codes in the profile and can not contain spaces.
<labels> - lets you give the list a name in defined locales, in this case English with the human readable name Dublin Core Format. If you were writing the profile to support more than one locale you would add labels for each locale. (Don’t worry if you don’t define labels for all allowed locales. CollectiveAccess will fall back to other languages if a label is not available in the user’s language).
hierarchical=”0” - controls how data will display and be used in the editing user interface. If hierarchical is set to 1, then the list can be a multi-level hierarchy.
system=”0” - determines if the list is one of the 33 System Lists.
vocabulary=”0” - controls if the list is treated as a controlled vocabulary included in vocabulary term searches.
item idno=”application” - the unique code name for this list item
application, audio & example - are items in the list. Note that the key for each item must be unique within the list.
enabled, default, & labels - define how items in the list will display. If enabled is set to 0, then the item will display but not be selectable. If default is set to 1, then the item will be the default selection in the list. Be sure to set only one item per list as default. Labels set the display label for the item. As with list preferred labels, you can define one preferred label per locale.
Once control lists are defined, they can be used in Metadata Element Set (Attribute) Definitions to catalog interface fields.
Metadata Element Set (Attribute) Definitions
Metadata element set definitions (element sets) are templates for the various data entry units in the cataloging interface. Element sets can define something as simple as a text field or as complicated as a repeating multiline form with text fields, date fields, measurements, drop-down lists and more. Thus the “sets” moniker - a single data entry unit can be composed of any number of basic attribute types (see Attribute_Types for a full list).
Before we go further, some terminology should be defined. A metadata element set is a collection of metadata elements that defines a single editable unit of metadata. Each element is a single value of some specific type - some text, a number, a date, a measurement, a point on a map, etc. Thus, an element set is a collection of values.
An element set does not represent data. Rather, it defines the structure of data you may create during cataloguing. An attribute is data structured according to an element set. Thus, you are not creating element sets when cataloguing. Rather, you are creating attributes patterned after some element set.
Element sets are highly configurable and key to creating custom systems. While standards are in general a very good thing, our experiences working with partner institutions have shown that successful systems need to be flexible and extensible. Every collection is different and just about every cataloging project has at least a few unique requirements. A configurable system permits strict adherence to standards or customization based on the needs of the project. While this may seem a little confusing at first, it actually gives you much more control of exactly what kind of data you would like to capture and how you would like it to display.
No specific element sets are required. You need only specify those that you need for your system; however there are a number of components that comprise an element set definition.
A basic element set looks like this:
<metadataElement code="description" datatype="Text">
      <labels>
        <label locale="en_US">
          <name>Description</name>
          <description>An account of the resource.</description>
        </label>
      </labels>
      <documentationUrl>http://dublincore.org/documents/dcmi-terms/#terms-description</documentationUrl>
      <settings>
        <setting name="usewysiwygeditor">1</setting>
        <setting name="fieldWidth">70</setting>
        <setting name="fieldHeight">6</setting>
        <setting name="minChars">0</setting>
        <setting name="maxChars">65535</setting>
      </settings>
      <typeRestrictions>
        <restriction code="r1">
          <table>ca_objects</table>
          <settings>
            <setting name="minAttributesPerRow">0</setting>
            <setting name="maxAttributesPerRow">255</setting>
            <setting name="minimumAttributeBundlesToDisplay">1</setting>
          </settings>
        </restriction>
        <restriction code="r2">
          <table>ca_places</table>
          <settings>
            <setting name="minAttributesPerRow">0</setting>
            <setting name="maxAttributesPerRow">255</setting>
            <setting name="minimumAttributeBundlesToDisplay">1</setting>
          </settings>
        </restriction>
      </typeRestrictions>
    </metadataElement>
DataTypes (AttributeTypes)
Each element in an element set must be declared with a specific datatype (sometimes referred to as attribute types). These configure what kind of data will be entered into a specific element, how it will be formatted, and how it will be stored. At this time there are 20 Attribute Types to chose from.
Lists are unique because they require reference code names defined in your list definitions. For example:
<metadataElement code="dcFormat" datatype="List" list="dc_format">
      <labels>
        <label locale="en_US">
          <name>Format</name>
          <description>The file format or physical medium or dimensions of the resource.</description>
        </label>
      </labels>
      <documentationUrl>http://dublincore.org/documents/dcmi-terms/#terms-format</documentationUrl>
In this element set the code name is dcFormat, its datatype is List, the preferred labels are in English it is “Format”. A description has been added and will appear as help text in the cataloging interface when the label is moused over. The list is defined from a code name defined in the list definitions. In this particular case it’s dc_format. This links the element set with its corresponding List in list definitions creating the necessary code for the controlled vocabulary values. See List and Vocabulary Management for more details.
Settings
Next, the settings define how and what the data field will display. Settings vary based upon the datatype of the element. For a text element settings include width, height, maximum and minimum characters allowed. Refer to Attribute Types for specific settings.
If you would like to make a particular text field a required data entry point, set your minimum characters to 1. This will require at least 1 character to be entered in the field before the element set can be saved.
When defining list elements, you can use the render setting to control whether the list is displayed as a drop-down menu (render=select); radio buttons (render=radio_buttons); Yes/no checkbox (render=yes_no_checkboxes); a checklist (render=checklist); type-ahead lookup (render=lookup); horizontal hierarchy browser (render=horiz_hierbrowser); horizontal hierarchy browser with search (render=horiz_hierbrowser_with_search); or vertical hierarchy browser (render=vert_hierbrowser). More information on List settings can be found here.
To configure the sort order of list items, you can use the defaultSort setting. This setting using numeric codes: Sort by label = 0; Sort by rank field = 1; Sort by value field = 2; and Sort by idno = 3.
Type Restrictions
Type restrictions do pretty much what they sound like they do - they restrict element sets according to types. More precisely they restrict element sets to specific item types (objects, entities, places, occurrences, etc.) and define how attributes can be created and displayed. It is possible to target a restriction to an item type in general or to a specific type value for an item. For example, if you have defined an object type (in the object_types system list) of “periodical”, you can restrict an element set to be valid for only objects that are periodicals. Attributes of that element set will appear on editing forms only for periodicals (and whatever else it is bound to via type restrictions). Type restrictions can be assigned to as many item types as necessary for that particular element set.
Defining a restriction by, for example, object types creates unique cataloging interfaces based on the kinds of objects that you have in your collection. For instance, you may want to have different data entry fields for multimedia content than you want for paper-based materials. By defining these object types in the list definitions and then linking them to “type” under type restrictions, you can create object type-specific cataloging interfaces.
<typeRestrictions>
    <restriction code="r1">
        <table>ca_objects</table>
        <type>moving_images</type>
        <settings>
            <setting name="minAttributesPerRow">0</setting>
            <setting name="maxAttributesPerRow">255</setting>
            <setting name="minimumAttributeBundlesToDisplay">1</setting>
        </settings>
    </restriction>
</typeRestrictions>
Note
Note that the item type specification - what type of item the restriction is bound to - is called “table” in the profile code. This is because the item types are specified using the names for their tables in the CollectiveAccess database. Specific table names are used for these Primary Types.
Each type restriction can take settings. Currently defined settings values are:
Setting |
Value |
|---|---|
minAttributesPerRow |
Minimum number of attributes of this kind that must be associated with an item; set to zero to make the attribute optional; valid value must be a positive integer. |
maxAttributesPerRow |
Maximum number of attributes of this kind that can be associated with an item; set to zero or do not set to enforce no limit; valid value must be a positive integer. Setting value to 1 will disable the repeat attribute option in the editor screen, set to 0 or greater than one will enable the attribute repeat feature and display the “Add” link (eg. [+]Add <attr_name> ) immediately below the attribute data entry. |
minimumAttributeBundlesToDisplay |
The minimum number of attribute bundles to show in an editing form. If the number of actual attributes is less than this number then the user interface will show empty form bundles to reach this number. This number should be less than or equal to the maximum number of attributes per row; valid values are positive integers. |
User Interface Definitions
User interface definitions configure the layout of element sets within the cataloging system. Here you can bring together all the element sets and arrange them into a manageable cataloging interface through designation of Screens and Bundles.
Screens are used to group metadata attributes and create a desired cataloging workflow. Bundles are user interface elements that can be placed on each screen. They can be editable attributes of a specific element set or editable database fields intrinsic to a specific item type. Or they can be user interfaces that allow cataloguers to establish relationships with other items, add and remove items from sets and manage an item’s location in a larger hierarchy. Bundles are so named because they are essentially black-boxes that encapsulate various functionality. You don’t need to know how they implement this functionality. You need only place them where you want them to be.
That user interfaces are just ordered arrangements of form elements and controls - bundles - makes them highly configurable. Perhaps you want only Title and ID on the first screen, Basic info, and additional data on the second screen, Additional info, and multimedia on the third, Media. In Figure 2 you can see the various tabs in the left side navigation in Providence. These tabs are actually defined as screens in the user interface definitions found in the installation profile. Note that the Summary and Log tabs seen below are system screens that appear automatically. They allow you to display data and change logs associated with the record.
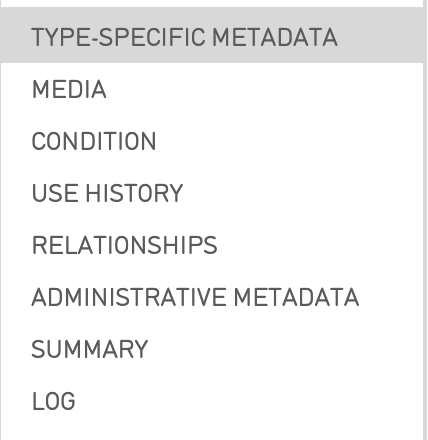
Side navigation tabs found under a record’s Inspector Window.
To organize the data fields on each screen, you must first declare which interface you are working within with a unique code and table type. After the editor is defined, you can begin to create and fill up screens.
<userInterface code="standard_object_ui" type="ca_objects">
      <labels>
        <label locale="en_US">
          <name>Standard object editor</name>
        </label>
      </labels>
      <screens>
        <screen idno="basic" default="1">
          <labels>
            <label locale="en_US">
              <name>Basic info</name>
            </label>
          </labels>
          <bundlePlacements>
            <placement code="idno">
              <bundle>idno</bundle>
            </placement>
            <placement code="preferred_labels">
              <bundle>preferred_labels</bundle>
              <settings>
                <setting name="label" locale="en_US">Title</setting>
                <setting name="add_label" locale="en_US">Add title</setting>
              </settings>
            </placement>
            <placement code="nonpreferred_labels">
              <bundle>nonpreferred_labels</bundle>
              <settings>
                <setting name="label" locale="en_US">Alternate titles</setting>
                <setting name="add_label" locale="en_US">Add name</setting>
              </settings>
            </placement>
            <placement code="ca_attribute_date">
              <bundle>ca_attribute_date</bundle>
            </placement>
          </bundlePlacements>
        </screen>
Note
Note that each entry in the bundle list is actually comprised of several parts: a unique code as key and an associative array as value. At a minimum, the value array must define a bundle using the ‘bundle’ key and a valid bundle name as the value. Depending upon the bundle being listed, other settings can be passed as well.
The list of valid bundles varies according to the type of item being edited. The object editor supports certain bundles that the entities editor does not. All editors support attribute bundles. To derive the bundle name for a specific element_set simply preface the element code with ca_attribute_ For example, the element_set creation_date would have a bundle name of ca_attribute_creation_date. The bundle names for various intrinsic database fields are the field names themselves. These Intrinsic Bundles names for other user interface elements are unique to the Primary Types.
Each bundle you add to a user interface can take optional settings depending on the bundle type. A full list of these settings is defined on the Bundles page.
The label and add_label allow you to override the default text labels in the user interface that are output above a bundle and on the add button respectively. Each of these settings is an associative array with locale codes as keys and the label text to use as values. Including both English and German display text translations would look like this:
<placement code="ca_attribute_description">
   <bundle>ca_attribute_description</bundle>
        <settings>
          <setting name="label" locale="en_US">Narrative description</setting>
          <setting name="label" locale="de_DE">Beschriebung</setting>
          <setting name="add_label" locale="en_US">Add another description</setting>
          <setting name="add_label" locale="de_DE">Addieren einen Beschriebung</setting>
        </settings>
</placement>
The restrict_to_type setting applies only to bundles that create relationships between items - bundles like ca_objects and ca_entities. By default these bundles will allow linking to an item of any type - for example, by default ca_entities will let you link to an individual, and organization or any other type of entity. restrict_to_type does just what it says, which is limit the bundle such that it allows linking only to a specific type. The value you set restrict_to_type to should be the identifier (idno field value) of the type you wish to restrict to.
For example, if you have an entity type of individual with its list item idno set to ind, then the bundle specification for a ca_entities linking control that only allows linking to individuals would look like this:
<bundle>ca_entities</bundle>
        <settings>
        <setting name="restrict_to_types">ind</setting>
        </settings>
Additionally, the restrtict_to_relationship_types setting applies only to bundles that create relationships between items - bundles like ca_objects and ca_entities, but need to be linked to a specific relationship type. By default, when you create a relationship between any two records, that relationship can be defined through Relationship Types. Furthermore, those relationship types can have hierarchical subtypes and so on. This is where being able to restrict to a relationship type is useful.
For example, let’s say you have entities relationship types that are creator, contributor, and publisher. These are further defined by another level of sub-types, so you can further define creator as artist, author, director, etc; contributor as assistant director, production assistant, etc; and publisher as copyright holder, distributor, etc. You can use restrict_to_relationship_type to create a relationship field limited only to that type. To create a relationship field that would only be limited to creator types, it would look like this:
<placement code="ca_creator">
       <bundle>ca_entities</bundle>
       <settings>
       <setting name="restrict_to_relationship_types">creator</setting>
       <setting name="label" locale="en_US">Creators & contributors</setting>
       <setting name="add_label" locale="en_US">Add creator & contributor</setting>
       </settings>
     </placement>
As of version 1.7 you can restrict display of bundle placements on a screen depending upon the type of the record being edited. For example, you can set up a bundle that appears when editing objects of type “book” but not type “video”. By default a bundle will display for all types. To restrict it, set the typeRestrictions attribute in the <placement> tag to a comma-separated list of type codes. For example:
<placement code="ca_creator" typeRestrictions="book,document">...</placement>
Relationship Types
CollectiveAccess creates relationships between records that are qualified by descriptive types. These types for Relationships create the necessary language to describe relationships between items in the cataloging interface, from the point of view of either item. For example an entity can be a “creator” of an object, and an object can be “created” by an entity. Each possible relationship in CollectiveAccess has its own list of relationship types. You must define at least one type for each relationship. Relationships with no defined types will not be usable.
When specifying relationship types in a profile, you must specify to which relationship each type belongs. Each has a unique name, which is actually the name of the underlying database table that stores the relationship data. The naming of these tables follows a simple pattern: the names of the two items related connected by “_x_” and prefixed with ca_. Thus the name of the object to entity relationship is ca_objects_x_entities.
However, it’s not quite so simple; you can’t just guess the names without resorting to a list. The order of the two item names matters, but does not follow a clearly predictable pattern. ca_objects_x_entities works but ca_entities_x_objects doesn’t. Therefore, the naming Relationships is critical.
Relationships manifest themselves in the cataloging interface as repeating bundles that consist of:
A relationship type drop-down to qualify the relationship
An autocompleting lookup into the related authority
An optional date range qualifier
Optional attributes (generally text, but could include other types of data)
Optional reification - relationships between the relationship on other authority items
Note that the date range qualifier, optional attributes and reification are not implemented in the user interface yet. Relationship types bundles are typically expressed like this.
<relationshipTable name="ca_objects_x_entities">
     <types>
       <type code="creator" default="1" rank="1">
         <labels>
           <label locale="en_US">
             <typename>created by</typename>
             <typename_reverse>is creator</typename_reverse>
           </label>
         </labels>
         <subTypeLeft> </subTypeLeft>
         <subTypeRight/>
       </type>
       <type code="publisher" default="0" rank="3">
         <labels>
           <label locale="en_US">
             <typename>published by</typename>
             <typename_reverse>is publisher</typename_reverse>
           </label>
         </labels>
         <subTypeLeft> </subTypeLeft>
         <subTypeRight/>
       </type>
       <type code="contributor" default="0" rank="2">
         <labels>
           <label locale="en_US">
             <typename>contributed by</typename>
             <typename_reverse>is contributor</typename_reverse>
           </label>
         </labels>
         <subTypeLeft> </subTypeLeft>
         <subTypeRight/>
       </type>
In this example the relationship types are ordered as follows: creator, contributor, publisher. This order is established by the rank setting in the type tag.
Putting It All Together
To briefly summarize the components of installation profiles:
Locales define languages for translations and these codes are used throughout the profile under “preferred_labels”
List Definitions create system lists, user lists and vocabularies. - System Lists determine the types of objects, entities, places, etc., that will display in your system and their sources. System types can also be used to restrict metadata element (attribute) sets to a specific type. - User Lists create simple controlled vocabularies. User lists are used in metadata element (attribute) sets to reference a specific list of types when the DataType “List” is used. - Vocabularies create multi-level controlled vocabularies, the terms of which can be related to other items for descriptive cataloguing.
Metadata Element (Attribute) Sets configure the look and function of data entry fields in your cataloging system. They must be defined by one of several AttributeTypes. Metadata Element (Attribute) Sets are referenced in Bundles to design Screens in User Interface Definitions.
User Interface Definitions layout the cataloging navigation in Providence. These are divided into one or more screens, each of which contains one or more bundles.
Bundles are user interface elements that can be placed on each screen. They can be editable attributes of a specific metadata element set or editable database fields intrinsic to a specific item type. Or they can be user interface elements that allow cataloguers to establish relationships with other items, add and remove items from sets and manage an item’s location in a larger hierarchy.
Relationships create the relational structure and language between items. - Relationship types qualify relationships
Modifying an Existing Profile
The simplest way to create a custom cataloging interface is to modify an existing profile. You will find in the Configuration Library at CollectiveAccess.org profiles implementing many different metadata standards and suitable for a wide range of projects. Select the profile that most closely matches your collection or cataloging project. Review the documentation on that profile and determine what changes, if any, need to be made.
Next, map the required changes to the five profile sections. Do you need a translation? Then set up a locale. A new list of media formats? Set up a new list definition. Create a new element set for that list and then add it to a bundle in user interface definitions.
Modifying an existing profile will help to ensure that all the necessary components for a functioning installation profile are present and working. It also saves a whole lot of typing!
Building a Profile from Scratch
It is highly recommended that you modify an existing profile, but if for some reason you find that none of the existing profiles meets the needs of your project then you may need to build a new profile from scratch.
Begin with the Basics
Before coding a new profile, it’s very important to think about how you want your catalog to function. Ask yourself these questions:
What kind of objects are in my collection?
What information do I need to organize and find these objects?
How do I want this information be structured?
Try creating a spreadsheet with all the elements (data entry fields) you want to have in your system. Include a definition for each element, how it will be used, if any special functions are needed (controlled vocabularies, dropdown menus, etc), if the element will be required, and any other details you think are necessary to note.
Study other Profiles and the Wiki
Another extremely helpful exercise to go through before coding a new profile is to closely analyze existing profiles for their layout, patterns, and format. The xml files for profiles available in your CollectiveAccess installation can be viewed at:
install/profiles/xml/nameofprofile.xml
This wiki is also a great resource. It may be helpful to review more in-depth technical documentation about the topics discussed in this introductory guide.
Work in Sections
There are 5 sections that open and close with every part of the profile (i.e. <locales>, <elementSets>, etc.) and each uses aspects from another section or builds upon the next section. Begin with the first section, and move through one part at time taking note of code names and formatting as you go along. Working slowly and carefully will pay off later during installation and testing.
Saving a Profile
Save your file in:
install/profiles/xml
Once saved, your new profile should display in the dropdown menu on the installation webpage.