User Access Control
There are many ways to grant and restrict access in CollectiveAccess using settings that can be enabled in the installation profile, including:
Enabling these controls and customizing the controls settings will affect which records can be viewed, what information within records can be viewed, and by whom, in a given system.
Intrinsic Access Bundle
When the intrinsic bundle “access” is included on an editing form, it can be used to set which records are viewable/restricted in Pawtucket. No special configuration is needed to utilize these checks, as this is a baked-in feature, although it is possible to customize the settings.
In Pawtucket’s /app/conf/app.conf file you’ll see the following:
# -------------------
# Item viewability (access enforcement)
# -------------------

<!--T:5-->
# if set, no access checks are performed
dont_enforce_access_settings = 0

<!--T:6-->
# list of values for 'access' field in objects, entities, places, etc. that allow      public    (unrestricted) viewing
public_access_settings = [1]

<!--T:7-->
# list of values for 'access' field in objects, entities, places, etc. that allow  privileged viewing
# (ie. user in on a privileged network as defined below)
privileged_access_settings = [1,2]

<!--T:8-->
# List of IP address to consider "privileged" (can see items where access = 1 or 2)
# It is ok to use wildcards ("*") for portions of the address to create class C or B addresses
# Eg. 192.168.1.5, 192.168.1.* and 192.168.*.* are all valid and increasingly broad
privileged_networks = [192.168.6.*]
It’s also possible to change the default values of the access drop-down by copying the list “access_statuses” from the base profile into a custom profile. Once there any value can be altered to meet local needs.
Metadata-level Access Control
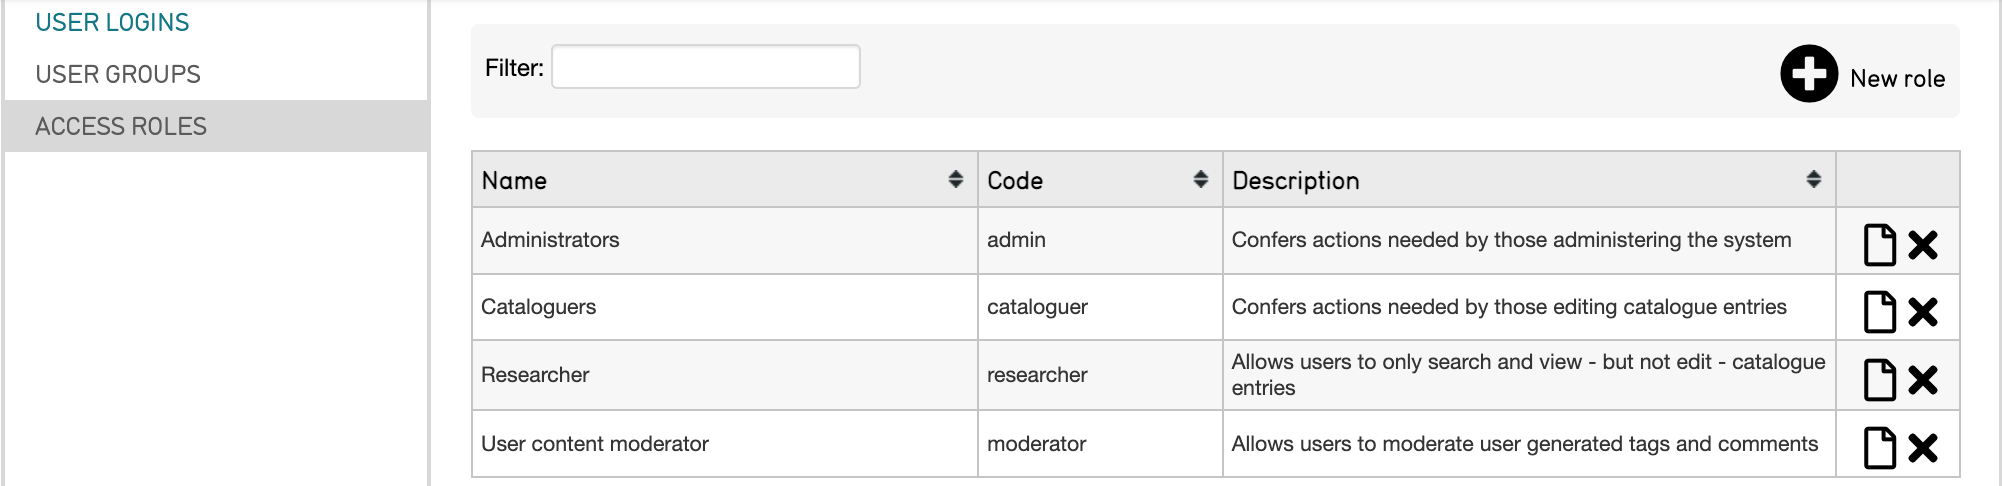
Use metadata-level access control to set specific metadata elements as “No Access” “Read-only access” or “Read/edit access” for different access roles in Providence.
To alter the settings in the user interface, navigate to Manage > Access control > Access roles:
Select the page icon  to the right of the role you’d like to edit.
Where you can edit the role:
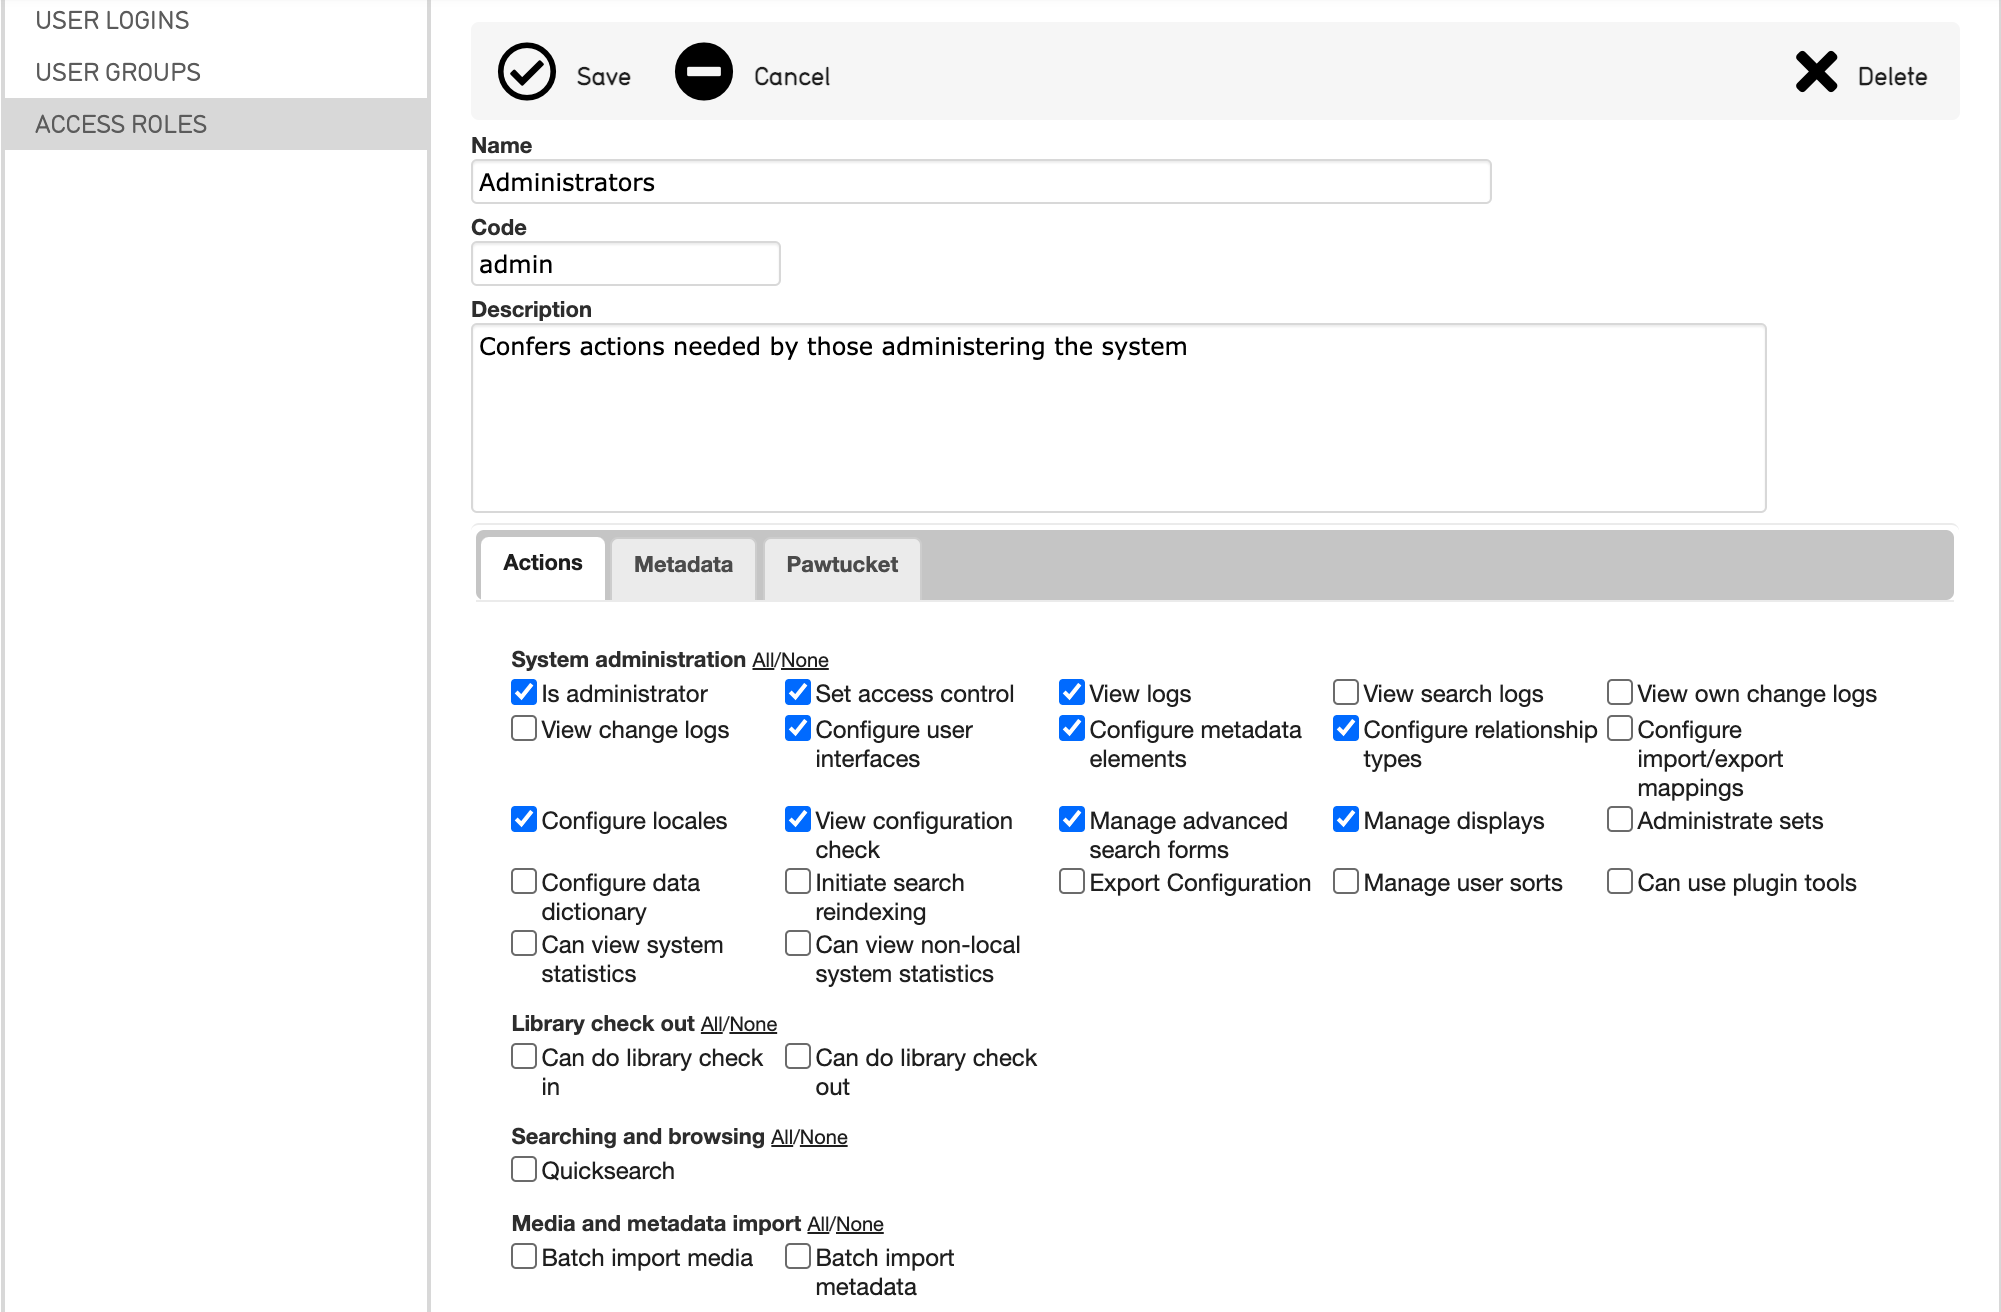
From the tabs, select Metadata.
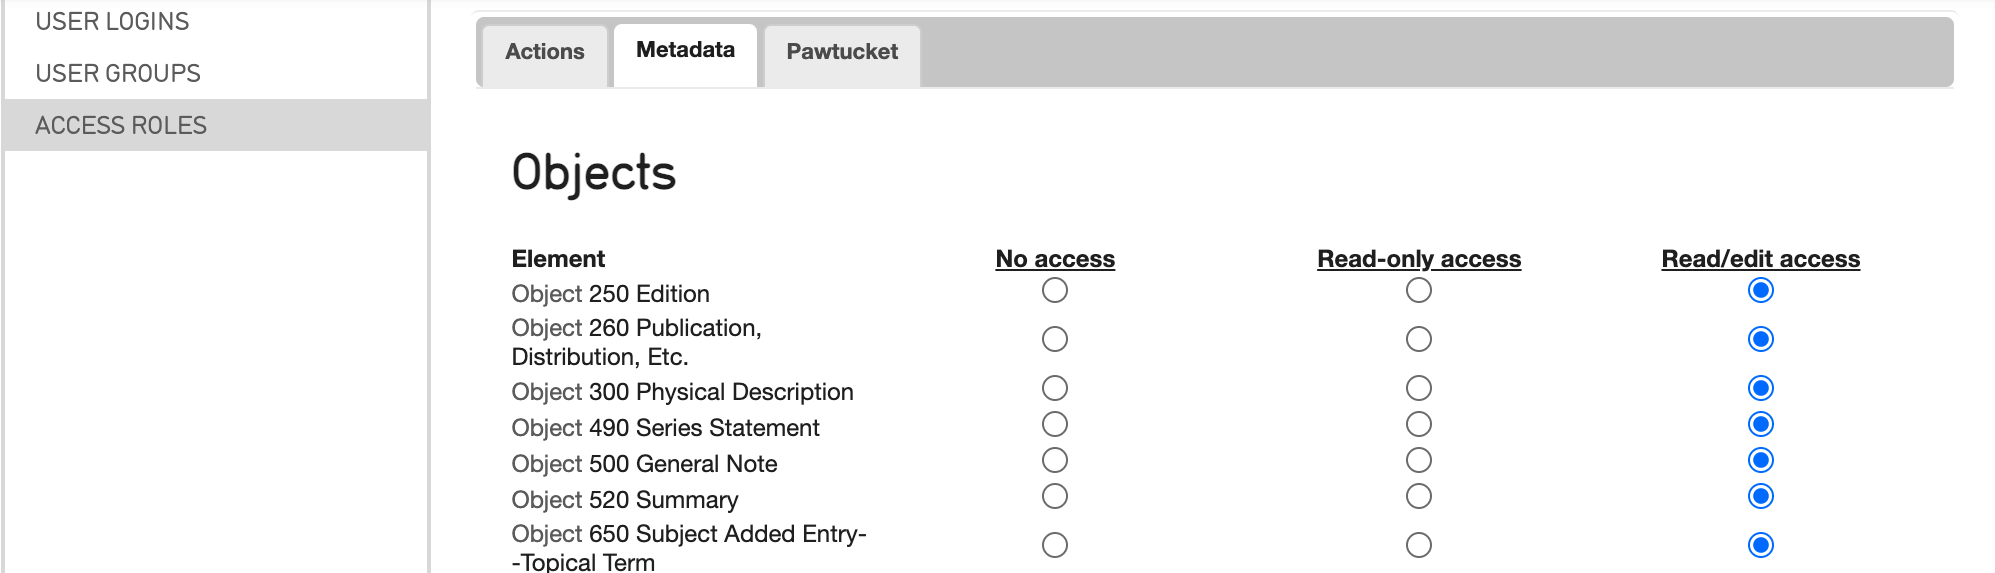
Where you can configure role access for various elements relating to primary tables in the system.
In the profile, use the following syntax:
<role code="intern">
   <name>Intern</name>
   <description>Access control actions defined for Interns</description>
   <actions/>
   <bundleLevelAccessControl>
     <permission table="ca_objects" bundle="ca_attribute_current_insurance" access="none"/>
     <permission table="ca_objects" bundle="ca_attribute_additional_costs" access="read"/>
   </bundleLevelAccessControl>
   <typeLevelAccessControl/>
   <sourceLevelAccessControl/>
</role>
Type-level Access Control
To use type-level access control, set the following in Providence’s /app/conf/app.conf:
# -------------------------
# Type-level access control
# -------------------------
perform_type_access_checking = 1

<!--T:17-->
#if set to zero type-level control will be disabled

<!--T:18-->
default_type_access_level = __CA_BUNDLE_ACCESS_EDIT__
Once this checking is enabled for specific record types, such as certain object_types, it can be set as “No Access,” “Read-only access,” or “Read/edit access” for different access roles in Providence.
In the profile, use the following syntax:
<role code="intern">
   <name>Intern</name>
   <description>Access control actions defined for Interns</description>
   <actions/>
   <bundleLevelAccessControl/l>
   <typeLevelAccessControl>
     <permission table="ca_objects" type="image" access="read"/>
     <permission table="ca_objects" type="book" access="edit"/>
     <permission table="ca_objects" type="document" access="none"/>
   </typeLevelAccessControl>
   <sourceLevelAccessControl/>
</role>
Source-level Access Control
To use source-level access control set the following in Providence’s /app/conf/app.conf:
# -------------------------
# Source-level access control
# -------------------------
perform_source_access_checking = 0

<!--T:25-->
#if set to zero type-level control will be disabled

<!--T:26-->
default_source_access_level = __CA_BUNDLE_ACCESS_EDIT_

<!--T:27-->
Once this checking is enabled, records with specific sources can be set as “No Access,” “Read-only access,” or “Read/edit access” for different access roles in Providence. To alter the settings navigate to Manage > Access Control > Access Roles.
Note
Each record type must have a source list defined (i.e. “object_sources,” “entity_sources,” etc.) to use this access control type. The intrinsic bundle “source_id” can be placed on an editor form to allow cataloguers to select the relevant source for a record. When a default source is set for a specific access role, the source_id bundle is optional. The default will automatically set the source for that login.
In the profile, use the following syntax to set source control:
<role code="intern">
    <name>Intern</name>
    <description>Access control actions defined for Interns</description>
    <actions/>
    <bundleLevelAccessControl/l>
    <typeLevelAccessControl/>
    <sourceLevelAccessControl>
      <permission table="ca_objects" source="archive" access="read"/>
      <permission table="ca_objects" source="collection" access="none"/>
      <permission table="ca_objects" source="library" access="edit" default="1"/>
      <permission table="ca_entities" source="all_departments" access="edit" default="1"/>
    </sourceLevelAccessControl>
 </role>
Item-level Access Control
Use item-level access control to hide full records from specific users or user groups in Providence. Set the following in Providence’s /app/conf/app.conf:
# -------------------------
# Item-level access control
# -------------------------
perform_item_level_access_checking = 0

<!--T:35-->
#if set to zero type-level control will be disabled

<!--T:36-->
default_item_access_level = __CA_ACL_EDIT_DELETE_ACCESS__
For more about configuring these settings in the user interface and item-level control, see Access Control Settings.